| Tutorial >> Examples |
|
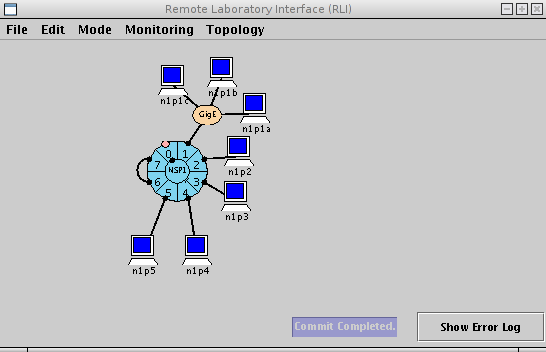
For each of the three experiments in this exercise, use a single cluster, with loopback link from port 6 to 7, and extra hosts on ports 4 and 5 (as in figure 1). Route all traffic for port 2 to port 6, and all traffic from port 6 to port 7. Otherwise, use default routes for all ports.
This plugin is designed to add a user specifiable delay to each packet. It can be used to help determine the effects of delay on certain types of network flows, as well as to emulate delay over a larger network.
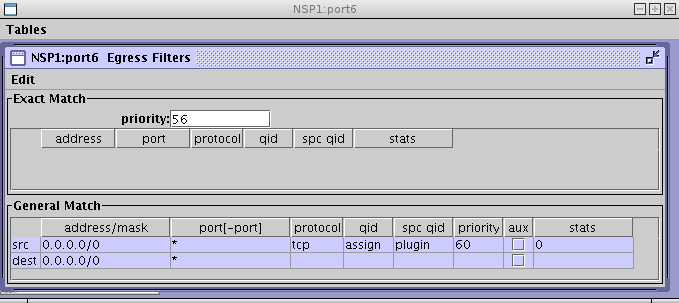
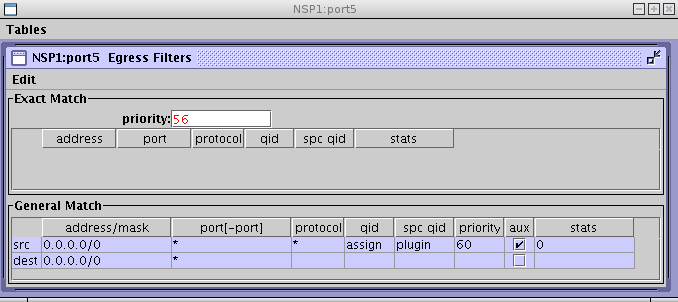
The first step in using any plugin is to add a filter to bind the plugin to. Open the egress filter table for port 6. Goto the Edit menu and select 'Add General Match filter'. Now, there are two lines on the General Match table; the defaults are fine, except you have to change the entry for 'spc qid' from 'no plugin' to 'plugin' (see figure 2). This is how the system know you intend to attach a plugin to this filter.
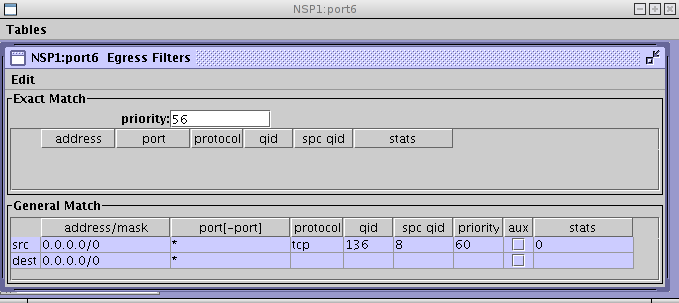
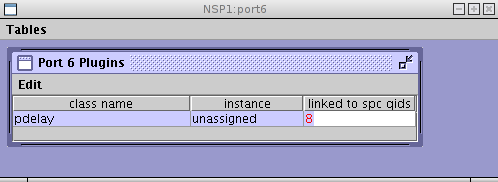
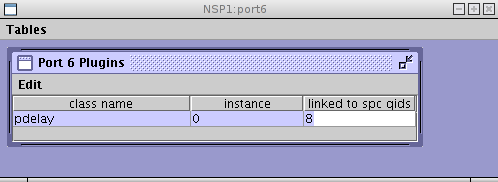
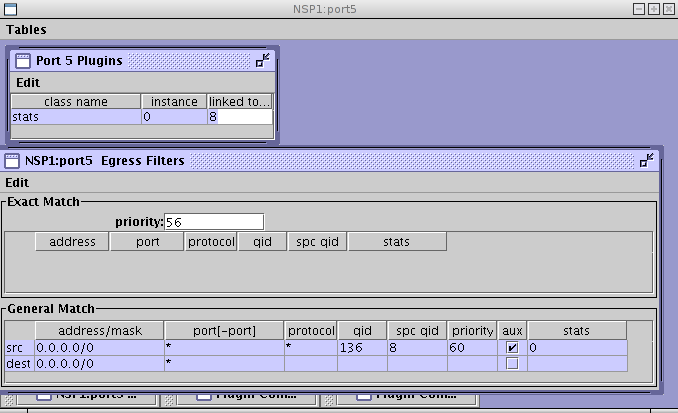
Now, commit your change, and you should see something similar to figure 3. In particular, note the number under the 'spc qid' heading; in this example, that qid is 8. Next, we need to add the delay plugin and attach it to our new filter. Open the plugins table for port 6. Goto the Edit menu, highlight 'Add Instance', and chose 'pdelay: 3579'. You should get a dialog box similar to figure 4, except you need to change the 'linked to spc qids' field to have the qid number from your filter. So, in figure 4, it is qid 8. Now, commit, and you should get something similar to figure 5.
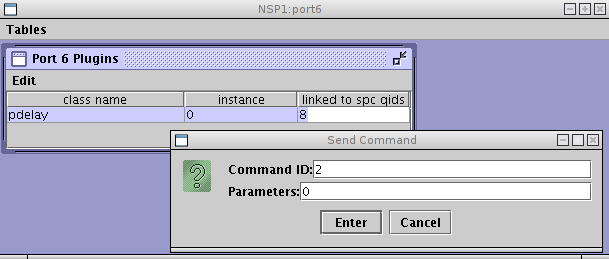
Next, we need to tell the delay plugin how much delay we want it to add to each packet. To do this, go back to the plugins table on port 6 and highlight the pdelay plugin in the table. Now goto the Edit menu and select 'Send Command to Instance'. For the delay plugin, command ID 2 changes the delay, and the only parameter is the new delay in milliseconds. Try setting it to 0 (zero) for now, as in figure 6.
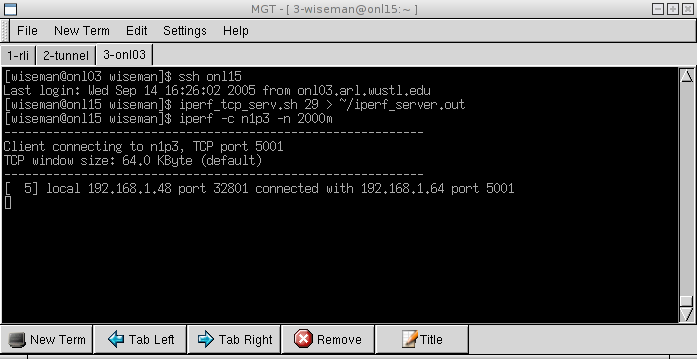
Now everything is in place. Goto n1p2 (onl15 in this example), start up an iperf tcp server on n1p3 (onl29 in this example), and try sending tcp traffic. Figure 7 lists these commands. If you are unfamiliar with iperf, go here: XXX
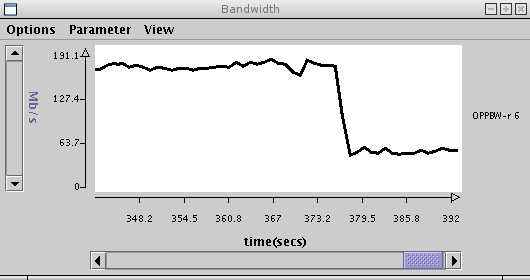
To see the delay plugin working, go back to the plugin table and set the delay to 5 while you have a tcp flow going. You should see a sharp drop in the bandwidth (figure 8).
Go ahead and play around with different delays to see the affect even small changes in network delay can have an TCP performance.
The statistics plugin is a simple mechanism that merely counts the number of packets it sees. It keeps three separate counts, one for icmp packets, one from tcp packets, and one for udp packets.
As in the delay plugin, we need to add a filter first. Open the egress filters on port 5, and add a general match filter. This time, you need to change three entries in the table. First, as before, change the 'spc qid' to 'plugin'. Second, check the top box under the 'Aux' column (this is only for this plugin, so that it functions correctly). Finally, change the protocol from 'tcp' to 0 (zero). This last step means that all traffic (not just tcp) will go through this filter. You should now have a table like figure 9. As before, after committing take note of the spc qid you are given.
Currently, the stats plugin is in a different directory that the standard plugins, so you'll have to add it's directory to the plugin list. To do this, open the plugin table for port 5, goto the Edit menu, and select 'Add Plugin Directory'. You will get a dialog box asking you to type the directory. Type '/users/jst/plugins', as in figure 10. Then, select 'Ok'. Now goto the plugin table, select the Edit menu and highlight 'Add Instance'. You should see a new set of plugins listed, as in figure 11. Select 'stats:100'.


As with the delay plugin, you only need to change the 'linked to spc qids' field to include the qid of the filter you added. In this example, it is qid 8. Commit your changes, and you should have something similar to figure 12.
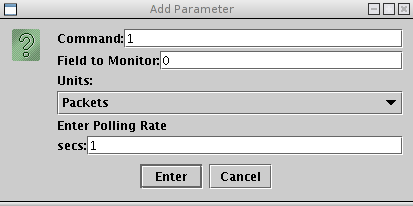
There are many ways to look at the information a plugin may have. One easy way is use RLI monitoring displays. To do this, make sure you are in Monitoring Mode, and open the plugin table for port 5. Double click the stats plugin entry in the table and you should get a dialog box. For the stats plugin, command 1 (one) returns three fields: the icmp packet count, the tcp packet count, and the udp packet count. So, use command 1, and monitor field 0. Make sure and select 'Packets' as the unit. You should now have figure 13. Click enter.
Go ahead and repeat the process to add the tcp and udp packet counts. It will make your monitors more readable if you change the titls of the particular graphs to something more meaningful. Do this by clicking on the name of the parameter (something like Plugin.0.1.0) and change the name field to something like 'icmp'. Now, log in to n1p4 and try sending a ping to n1p5. You should get something comparable to figure 14. You are seeing the number of packets the plugin has counted since the last call to command 1. Since the monitor polls once a second, you are effectively seeing packets/second going through the plugin.
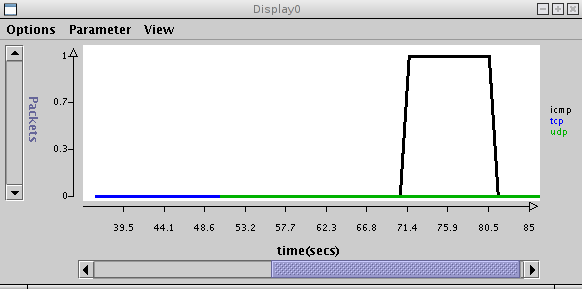
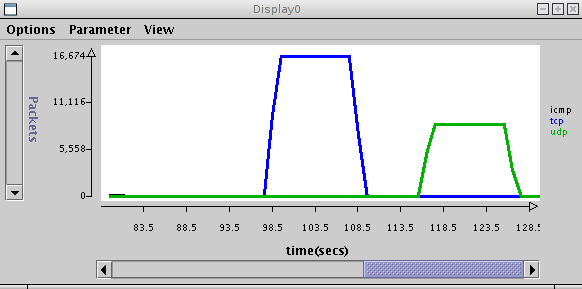
Similarly, you can now start up both tcp and udp iperf servers on n1p5. Then, try sending tcp traffic from n1p4 to n1p5, and then sending udp traffic. You should see something similar to figure 15, depending on your exact sending rates. In this example, the tcp flow was started with 'iperf -c n1p5 -t 10' and the udp flow with 'iperf -c n1p5 -b 100m -t 10'.
The multicast plugin is designed to emulate multicasts. It takes each packet it receives and makes a copy of it for each port the user has requested it to multicast to. Then, all of the copies get sent back into the network at once.
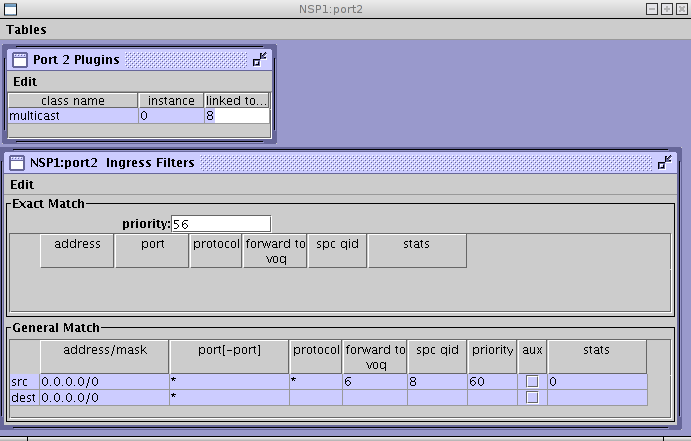
Again, with any plugin you have to start with a filter. Here, goto the ingress filter table for port 2 and add a general match filter. As with the stats plugin, set the protocol to 0 (zero), and set the spc qid to 'plugin'. There is another field here called 'forward to voq'. Click on the field, and you should get a scroll bar. Go down to the bottom and select 'use route'. This means that after the plugin is done, packets will be forwarding according the route table. Go ahead and commit. Now goto the plugin table on port 2 and add the 'multicast:101' plugin from the /users/jst/plugins directory (if you don't see this, goto the stats plugin example above add add it according to those directions). Make sure and put the spc qid from the filter into the appropriate place here, and commit. You should now have something similar to figure 16.
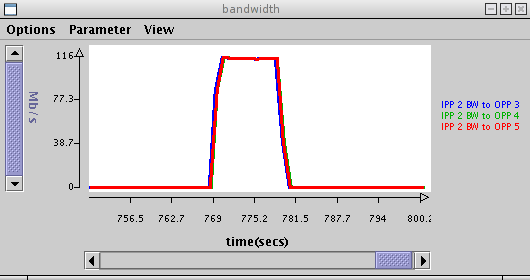
Now, we need to configure the multicast plugin to actually multicast any packets it gets. To do this, open the plugin table on port 2 and highlight the multicast plugin. Send a command to it (via the Edit menu, then 'Send Command to Instance'). For this plugin, command 2 tells it which ports to multicast to, with the only parameter being the port. To send it command ID 2, with parameter 3. Send another telling it to multicast to port 4 and another for port 5. Now, you'll need to start up iperf udp servers on n1p3, n1p4, and n1p5. Now, open a monitoring display, and look at the port 2 ingress bandwidth going to output ports ('Bandwidth to OPP') 3, 4, and 5. Finally, on port 2, start up one 100 Mbps iperf udp flow (iperf -c n1p3 -b 100m -t 10) going to n1p3. You should see something simliar to figure 17. That is, there will be approximately 100Mbps of traffic going from port 2 to each of ports 3, 4, and 5.
| Tutorial >> Examples |
|